RAG workflow explained

It’s common to retrieve text that’s relevant to a user’s query.

Registering your Documents

To start using Featureform for RAG, we should register the documents that we plan to use as context.

CSV File

For a CSV file on our local system, we can do the following:

episodes = local.register_file(
    name="mlops-episodes",
    path="data/files/podcast1.csv",
    description="Transcripts from recent MLOps episodes",
)

Directory of Text Files

For a directory of files on our system, we can do:

episodes = local.register_directory(
    name="mlops-episodes",
    path="data/files",
    description="Transcripts from recent MLOps episodes",
)

Pre-Processing

Our text files may be imperfect to use as context. We need to choose the right size and density of data to maximize the information we provide to our final prompt. If our text is too long, we may choose to chunk it. If it’s too short, we may choose to concatenate multiple into one. In almost every situation, there’s other sorts of cleaning of data that may have to be done.

Chunking

We can chunk by doing things like splitting on periods to create sentences or new lines for paragraphs. Langchain also has a set of text chunkers that can be used as well.

Concatenation

To concatenate, we can add together text that are relevant to each other. For example, we can choose to append all of the messages in a slack thread as one document.

Cleaning

Data is never clean. We may want to remove formatting and other imperfections using transformations.

Indexing / Embedding Data

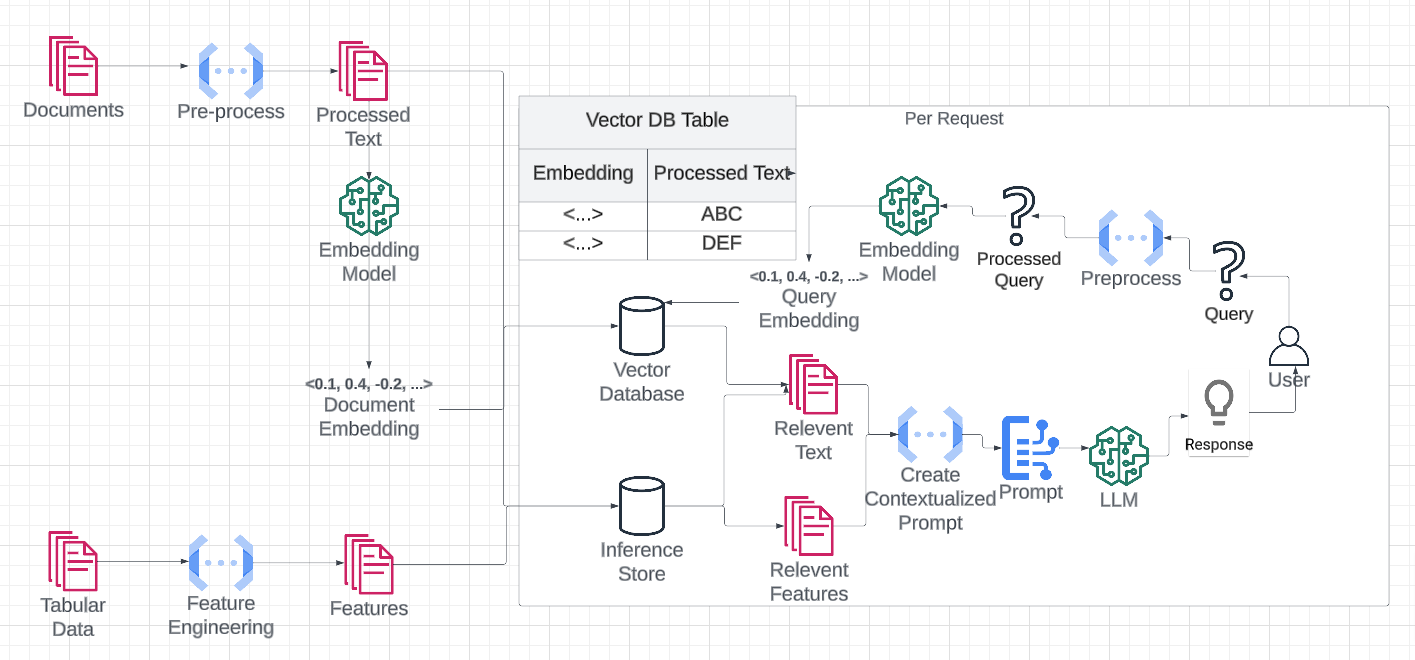
Now that we have our text cleaned up, we need to index it for retrieval. To do so, we’ll create an embedding of the text. We’ve written a long form article on embeddings. However, for this situation, you can simply think of them as a specialized index for similarity search. Text that’s similar according to the embedding model, will be near each other in N-Dimensional space. We’ll use a vector database for retrieval.

OpenAI’s ADA

We can use the ADA model from OpenAI to embed our documents. Note that this is a different model than GPT. It’s purpose it to convert text into embeddings for nearest neighbor lookup.

@local.df_transformation(inputs=[news])
def science_news_embeddings(news_df):
    import openai
    resp = ,
    science_news = news_df[news_df["topic"] == "SCIENCE"]
    science_news[“title_embedding”] = science_news[“title”].map(lambda txt: openai.Embedding.create(model="text-embedding-ada-002",input=txt)[“data"][0]["embedding"])
    return science_news

To test and analyze the resulted dataframe, we can call:

df = client.dataframe(science_news_embeddings)

HuggingFace sentence_transformers

sentence_transformers with HuggingFace is our recommended way of embedding models. It’s fast and free! The quality of embeddings will likely be slightly worse than ADAs though.

@local.df_transformation(inputs=[news])
def science_news_embeddings(news_df):
    from sentence_transformers import SentenceTransformer
    model = SentenceTransformer("all-MiniLM-L6-v2")
    science_news = news_df[news_df["topic"] == "SCIENCE"]
    embeddings = model.encode(science_news["title"].tolist())
    science_news["title_embedding"] = embeddings.tolist()
    return science_news

To test and analyze the resulted dataframe, we can call:

df = client.dataframe(science_news_embeddings)

Define and Manage Features and Embeddings

Now that we have built our datasets, we can start to mark columns as our features and embeddings and place them in our vector database.

Defining infrastructure providers like vector databases

In localmode, we’ll often want to use an external vector database to index and retrieve our vectors. Even though our embeddings will be computed locally (or via API if using ADA), the final embeddings will be written to a vector database.

Pinecone

pinecone = ff.register_pinecone(
    name="pinecone",
    project_id=os.getenv("PINECONE_PROJECT_ID", ""),
    environment=os.getenv("PINECONE_ENVIRONMENT", ""),
    api_key=os.getenv("PINECONE_API_KEY", ""),
)

Weaviate

We also support Weaviate!

Defining Feature and Embedding Columns

Now that we have our vector databases registered, we can specify the columns that make up our embeddings and our features. Note that embeddings are used to retrieve entity IDs, and that the actual text should be registered as a separate entity.

@ff.entity
class Speaker:
    comment_embeddings = ff.Embedding(
        vectorize_comments[["PK", "Vector"]],
        dims=384,
        vector_db=pinecone,
        description="Embeddings created from speakers' comments in episodes",
        variant="v1"
    )
    comments = ff.Feature(
        speaker_primary_key[["PK", "Text"]],
        type=ff.String,
        description="Speakers' original comments",
        variant="v1"
    )

Using the Featureform Client and Dashboard

We can run featureform dash to run and visualize our resources. We can go to http://localhost:3000 to look through it.

Creating Analytical Features

In your final prompt, you may also want to retrieve data by key. For example, if you’re providing a recommendation for someone, you might want to grab the last N items that they looked at from your feature store. This is the traditional way to use Featureform and you can learn more in our other documents

Retrieval

Now that our features and embeddings are created, we can begin to use them to construct our prompts.

Using an On-Demand Function to Embed the User Query and Retrieve Relevant Documents

We can use an on-demand function to retrieve documents that are closest to our embedding query.

@ff.ondemand_feature()
def relevent_comments(client, params, entity):
    from sentence_transformers import SentenceTransformer

    model = SentenceTransformer("all-MiniLM-L6-v2")
    search_vector = model.encode(params["query"])
    res = client.nearest("comment_embeddings", "v1", search_vector, k=params[2])
    return res

After applying, we can test it out:

Prompt Engineering / Construction

Now that we have our context, we have to build it into our prompt. A simple example that builds a prompt from the context is as follows.

@ff.ondemand_feature()
def contextualized_prompt(client, params, entity):
    pks = client.features([relevent_comments], {}, params=params)
    prompt = "Use the following snippets from our podcast to answer the following question\n"

    res = client.nearest("comment_embeddings", "v1", search_vector, k=params[2])
    for pk in pks:
        prompt += "`"
        prompt += client.features([("comments", "v1")], {"PK": pk})[0]
        prompt += "`\n"
    prompt += "Question: "
    prompt += params["query"]
    prompt += "?"
    return prompt

Common Prompt Construction Tricks

There are many tricks to prompt construction that may be useful.

Summarization

By starting prompts with “Summarize the following in four sentences “, we can use an LLM to summarize.

Diffs

If building an application to improve a piece of text, we may write something like: “Improve the following text and show a diff of your recommendation and the original text”

Playing a role

We can tell the LLM to “think” like a specific role. For example “Answer the following as if you are an MLOps expert”

Explain it like I’m 5

You can tell LLMs to explain their reasoning or explain things to you like you’re five years old. This often results in easier to follow explanations when we don’t need all of the details.

Formatting

We can tell and LLM how to format: Answer the following questions with five bullet points.

Understanding Token Length

There is a finite amount of text that we can put in a prompt. Our goal is to maximize the amount of relevant information to allow the LLM to be as accurate as possible while fitting in our boundaries. We should chose of text chunking (mentioned above in pre-processing) and the right amount of nearest neighbors to achieve this.

Summarization

A trick to fit more information in a context window is to use an LLM to summarize each relevant document that we retrieve. We can use an LLM to increase information density that we pass into our LLM! It’s inception :D

Putting it all together

Now that we have defined our final prompt on-demand feature, we can use it to feed into an LLM like OpenAI to retrieve our response.

prompt = client.features([contextualized_prompt], {}, params={"query": "What should I know about MLOps for Enterprise"})
print(openai.Completion.create(
    model="text-davinci-003",
    prompt=prompt,
)["choices"][0]["text"])

Checkout a full project on Github!